
Showing posts with label bandai. Show all posts
in case you haven't read the previous post: http://pinoy-gundam.blogspot.com/2013/05/arvin-pulls-off-stunner-master-grade.html
he's almost done and here are the finished weapons.


he's almost done and here are the finished weapons.

til next time! Mismo!
Introducing Percival "Zangetsu" Castro entry ! He's one of the regular members of PG, and also has a great taste on rendering his kits.


So here is his entry, MG Unicorn Banshee in standard color scheme. He really got me in his rendering by using gradients on the psychoframe.
Why is his build special?
Because his entry really depicts how does a psychoframe glow and heat up. Simple build yet fantastic depiction on the psychoframe :D This is really an amazing painted build in standard colors.
I hope he gets an award! Good luck on the nationals Zangetsu!
His WIP album can be found here https://www.facebook.com/media/set/?set=a.643855465630809.1073741825.100000190837547&type=1
These are some simple yet effective things to make your own base using foam, cement and paint.
I. making the terrain:
-conceptualize your contour
-cut or shape your terrain
-cover it with cement
-while the cement is damp, puncture it using your fingers to make "dimples" on your terrain.
-sprinkle some cement on your terrain. this make's the rough texture. then spray a a little bit of water.
-let it dry
-coat it with primer or some flat coat.
II. Painting the terrain
to make it look natural, we'll use watercolor or just use acrylic paint and dillute it on water.
-just apply it on the terrain preferably at the topmost part of the terrain and let it run on the grooves.
-use yellow paint first, then red, then some orange, then a bit of black on the dimples.
-let it dry and topcoat it.
Anyway it's an MG version of the RG counterpart. My guess is that this is obviously more articulated, probably has "open-hatch" feature, LED feature where you'll put it inside the back pack and insert the head of the LED inside the body. (why? because they said that bandai has a new evolution on the MG Series). I guess I should expect a ver. 3 of Zeta gundam.
Kit costs 4500 yen and the release date is on August


MORE IMAGES: Credits to Gaijin Gunpla
actual kit


When I was a kid my mom always used to say that refrigerators with the best cooling system are the most resilient. "Nak yung pridyider natin G&E ilang taon na pero daig pa yung lamig ng mga bagong ref na lumalabas ngayon"
Well she was half right, the coolest ref indeed starts with the letter G, but spelled different:
Meet the COOLEST Ref IN THE WORLD - Plasmate Dennis Chua's GUNPLA pridyider!


What an awesome ref, its just not the epitome of coolness- I feel full already just by looking at it LOL
Keep racking em up Dennis! Pretty sure you are gonna need a new ref soon hahahaha!
Till next, Mismo!
Well she was half right, the coolest ref indeed starts with the letter G, but spelled different:
Meet the COOLEST Ref IN THE WORLD - Plasmate Dennis Chua's GUNPLA pridyider!
What an awesome ref, its just not the epitome of coolness- I feel full already just by looking at it LOL
Keep racking em up Dennis! Pretty sure you are gonna need a new ref soon hahahaha!
Till next, Mismo!

Many members are asking how tall a kit specifically if it is in 1/144. So here's a guide on measuring your kit or non-specified scale figure (especially your gashapons and vinyl figures). Don't complain if this post is long, just read it. It's worth it.
So what is a scale?
It is a term we used to re-size the STANDARD measurement of a real life object into a miniature; or it can be re-sizing a figure into a higher/lower scale.
*a non-proportioned figure (like SD) doesn't have a scale if you compare it to a proportioned figure that has standard size, but you can re-scale it if you want to make it bigger or smaller.
Remember the higher the digit is, the smaller it would be. The lower the digit, the bigger it is.
How to convert a STANDARD size to a smaller scale?
example: I want to know how tall Neue Ziel is if it is in 1/144 and 1/100
First you need to know its standard height, just go to http://gundam.wikia.com and search for the model's overall height.
so Neue Ziel's height is 76.6 m
*note: metric system (meter, centimeter, kilometer) is easier to use than english system (inch, foot, yards)
*take note that we will use cm on every scale so imagine the scale to 1 cm/144 cm and 1 cm/100 cm. Don't ask, just do it.
Next step is to follow a formula:
1. Multiply the numerator by the standard measurement of the specified unit.
2. Then divide the result to it's denominator
76.6/144 = 0.5319cm , 76.6/100 = 0.766cm
3. Then multiply it by 100
0.5319cm(100cm) = 53.19cm, 0.766cm(100) = 76.6cm (well as you can see 1/100 is easier, just turn meters into centimeters)
so there you have it. Neue Ziel's Height on 1/144 scale is 53.19cm while it is 76.6cm in 1/100 scale.
How to identify the standard height on a specific scale?
given the scale and the measurement of the figure, you can easily solve it by doing the steps above in reverse.
1.Divide the height of the figure to 100
2. Then multiply the result of the figure to the denominator of the scale.
3. Then just change cm to m. (don't ask, it will be complicated, this post will be longer to read)
How to identify the scale of a non-specified scale figure?
A nice example on identifying a scale are gashapons. Just follow this steps to identify a scale of each individual gashapon.
1. Measure the height of the gashapon and always use centimeters.
2. Divide it by 100
3. Lastly use the answer to divide the standard size(just get the overall height of the unit in http://gundam.wikia.com)
example: I have a zaku II gashapon and it's height is 4cm.
4 / 100 = 0.04
The overall height of a Zaku II is 17.5m
17.5 / 0.04 = 437.5 round off the decimal number and you got the scale
so the scale of the gashapon is on 1/438 or 1/440 so it's easier to read.
How to re-size a kit into a bigger/smaller size scale?
a good example is turning your 1/100 kit to 1/24 or your 1/100 kit to 1/150. so follow these steps
1. Convert 1 meter to your preferred scale
1 meter on 1/24 is 4.17cm, while 1 meter on 1/150 is 0.67cm
2. measure your 1/100 kits dimension and multiply it with the preferred scale.
example if your exia's length forearm is 3cm multiply it with 4.17cm if it's on 1/24th scale or 0.67cm if it's on 1/150th scale. So the results are 12.51cm (1/24) and 2.01cm (1/150)
SO THERE YOU HAVE IT! IT'S EASY RIGHT?
ENJOY BUILDING.
So if you're now building bigger or smaller models with the help of this post, please do share your work to us and we will feature it :)
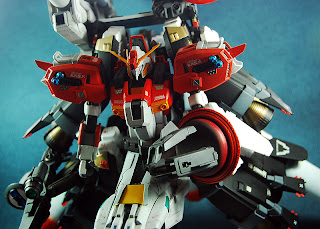
P-Bandai Hobby Online Shop Exclusive: MG 1/100 XM-X2 Crossbone Gundam X2 Ver. Ka - Painted Build by Bandai-Hobby.net
Release date: June 2013
Price at around: 4,620 yen
Images courtesy of Bandai-Hobby.net


Some example runners

For the full view of the runners you can look at here on Bandai-Hobby.net
Release date: June 2013
Price at around: 4,620 yen
Images courtesy of Bandai-Hobby.net


Some example runners
For the full view of the runners you can look at here on Bandai-Hobby.net
PLAN303E MG Deepstriker MkII: Anazasi-Scratchbuild WIP
Tag :
1/100,
anazasi,
anime,
bandai,
collection,
custom build,
deepstriker,
gff,
gundam,
Gundam Fix Figuration,
gunpla,
kitbash,
master grade,
MG,
Plan303E,
scratchbuild,
sentinel,
uc
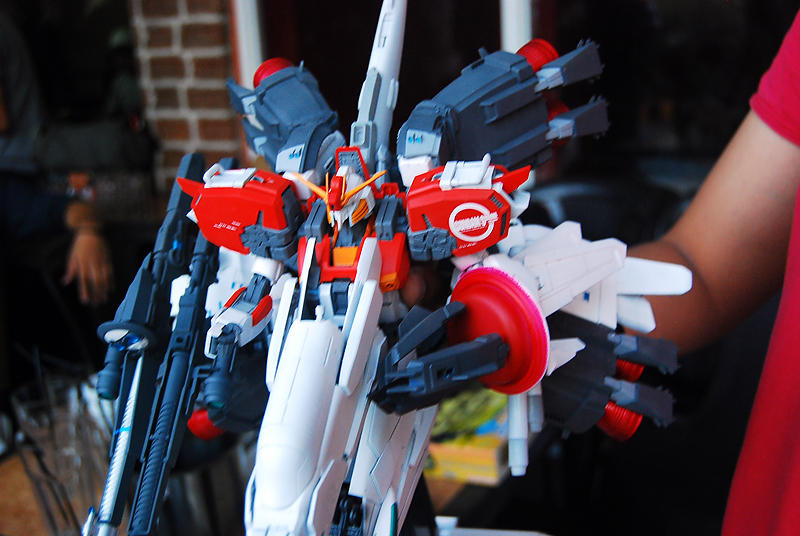
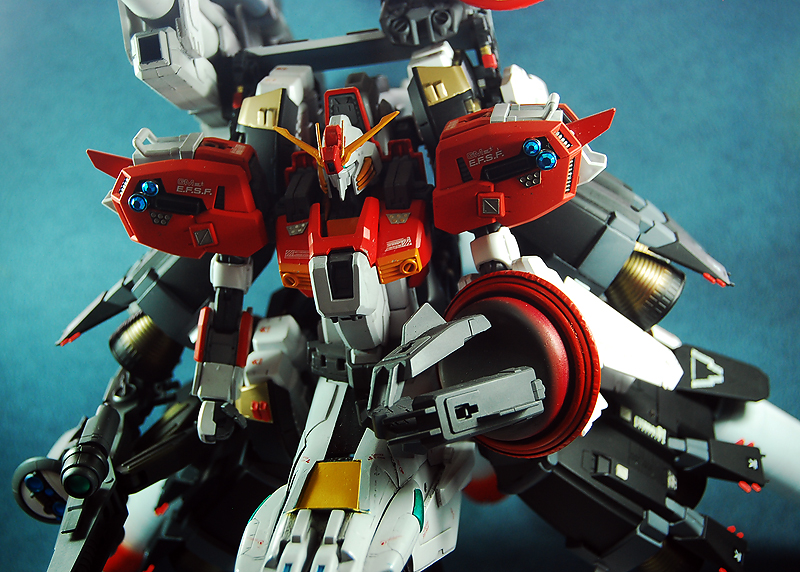
The MG Deepstriker Project was unveiled last December just in time for the PG-GMAC Xmas Kitakits. Daddy Vanz "Anazasi" Hilario prepared the MkI version of the kit back then.

It was around 60% completed, and right after Anazasi decided to add some tweaks to the WIP to further improve the design. Now its around 90% done with only the front armor and 303E decals pending.
It looks really good at this stage that we decided to make a photoshoot of the WIP proper.
ENTER MkII!!!


Just a few more tweaks here and there. Target completion is very soon. More pics to follow.
Till next, Mismo!
Arvin's Bed of Roses
Tag :
1/100,
1/144,
1/60,
age,
bandai,
collection,
gundam,
gunpla,
hguc,
hobby,
master grade,
mecha,
MG,
perfect grade,
PG,
pinoygundam,
strike,
zaku
Howdy Plasmates!
Arvin Angeles is one of the country's premiere hobbyists. His collection has been featured time and again on various media outlets and even if he is currently based in Singapore, it didnt stop the man from keeping up with his unbridled passion for gunpla.
These photos put Bon Jovi's bed to shame LOL
Hope my bed gets jampacked like this someday, definitely awe-inspiring.
Till next, Mismo!
Robot Damashii RX-78-2 Gundam is another re-make upon re-make of the grand daddy of all Gundams the RX-78-2 if my memory serves me right it already has countless version of it. From Mobile Suit In Action down to the smallest scale of HCM-PRO and back again to the next generation of mecha action figure called Robot Damashii or Robot Spirits. To my surprise this new incarnation or version of RX-78-2 has all the hand held weapons that you could have ever dreamed of on having it as a complete set. Some older generation of RX-78-2 doesn't have a complete set of weapons or cool extra's like the javeline, ball and chain, or the slash effect of the beam saber, or an extra shield, beam bazooka, and beam rifle.

The only thing that turns me off with this version is the lack of
details coming in from its older brother like the Gundam Fix Figuration
or the Super HCM-Pro. I don't mind the open exhaust effects like the one
in the Super HCM-Pro. I also don't mind the GFF Metal Composite version
of Gundam it's too expensive for me. Just give me the superb details
and a complete set of hand held weapon and a low price and I'm all set
for the Gundam geekiness.

Now let's talk about the articulation of the Robot Damashii RX-78-2. Articulation of this version is really superb the elbow's are double jointed which means it's really flexible when you do a full closed elbow pose. Also below the elbow joint are also articulated like you can turn it around. The hands are also articulated where you can move it slightly up or down but you can't open or closed the whole fingers like its Super HCM-Pro version.


The legs are also double jointed which means the leg articulation is flexible but simple where you can do a knee pointed pose or a kneeler. You can also do a perfect straight forward kick because the skirt will move up when you move the legs forward upwards. You can also do the splits but not entirely a split. The feet toes are also movable were you can make a whole 90 degrees downwards out of it.

Well I guess that's the whole articulation of the Robot Damashii RX-78-2 Gundam all I could say is that this version is really excellent and awesome. You can make a lot of good pose out of it were you can imitate a lot of poses from the anime. Now for the good stuff the weapons and it's extra accessories. The weapons comes with a basic two beam saber holder, one beam bazooka, one beam rifle, a beam javeline, gundam hammer, and a shield. The extra's includes a rocket launcher for the beam rifle, pointed gundam hammer the ball pointed one, extra beam rifle and extra rocket launcher for the beam rifle, extra beam bazooka, an extra shield, and a super slashed effect of the beam saber.
 |
| Full Weapon load |

The gundam hammer chain's are metal not some kind of plastic and it also has a holder for the gundam hammer. Where you could put it on the side or the back. It also include's an extra V shape fin. The hands includes two closed fist, two open palm hand, two hand for holding a gun, and a two semi-open hand for holding the beam saber.

Another awesome good stuff for the RX-78-2 is the shield were you can store and put the beam bazooka into the shield, same as the beam rifle and the two beam saber holder. You can actually do this one on the other shield as well. Imagine RX-78-2 Gundam holding a double shield with a two beam bazooka stored on it and holding a beam saber is really uber cool. Also you can put the beam bazooka on the back just below the back pack. Also you can cling the beam rifle on the side skirt. Plus you can also put the shield on the back on its back pack.
Over all this is the best of all the action figure of the RX-78-2 Gundam for me. I give this a 9/10 why because I already said it the lack of small details that will make this more superb. This is really a highly recommended fig. I love fiddling with this and right now I'm waiting for the re-release of the Zaku II so that my RX-78-2 Gundam will have a sparring partner.


